Hard drives are reliable, but sometimes they can ditch, primarily when a virus attacks them. On the other hand, sometimes people need to re-install their Windows again.
If a user has put all their data into a simple local drive C, they may have to lose their data. This is the reason a disk partition is necessary. A disk partition would not only divide the C drive into logical units, but it will also increase the PC’s efficiency.
One can manually perform a disk partitioning tool, but it can be quite tricky for some. There is an easy way to perform efficient disk management, which is possible with the help of a partition assistant program.
The best software to mention in this regard is the AOMEI Partition Assistant. This particular partition utility is one of the best disk management tools one can find. The reason for its popularity is its easy partition method, a user-friendly interface, and advanced options that can be quite handy.
This article will tell how to use the AOMEI Partition Assistant, its different functionalities, and its benefits.
How To Use AOMEI Partition Assistant – Step By Step Guide
First of all, browse the web and download the AOMEI Partition Assistant. Here is the procedure:
- Go to diskpart.com The AOMEI Partition Assistant freeware will be present in the front.
- Hit the download freeware option and let it download.
- After that, launch the AOMEI installer and let the utility install.
- When the installation is finished, launch the AOMEI Partition Assistant.
The partition manager is ready to use. One can now proceed to create a hassle-free disk partition on their PC and laptops. Let’s discuss a bit more about Partition creation and how to perform it.
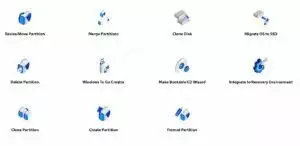
Partition Creation
Creating a partition can be quite crucial. It not only makes the PC faster but also protects the data from loss. One of the most significant benefits of disk partitioning is that one can separate their OS from data, add multiple boot setups, and organize their data according to its importance.
Partition also helps to protect the data from getting deleted. It can also lessen the size of the cluster, hence improving data storing efficiency.
Here are some of the ways one can use AOMEI Partition Assistant for.
Creating Partition (Unallocated)
In the first scenario, the user can see the unallocated disk space on their main screen of the program. To assign a partition to it, follow these steps:
- Go to the unallocated portion.
- Right-click on it.
- Select “Create Partition.”
- Now select “Advanced” in the pop-up window.
- Enter the partition label, its type, size, file system, etc.
- After the selection is complete, click on OK.
- Now review the selections made, confirm them, and click on Apply.
- The program will create a partition on unallocated space.
Creating Partition (Existing Partition)
Sometimes the unallocated space is unavailable. This is why the AOMEI Partition Assistant allows its users to create a partition within a partition by reducing the size of an already large section. Here’s how to do it:
- Select the desired partition.
- Right-click on it.
- Tap on “Create Partition.”
- Now select “Advanced” in the pop-up window.
- Enter the desired partition label, file system, size, drive letter, type, etc.
- Click “OK” when the selection is made.
- Preview to compare the changes made.
- Click on Apply to save the partition changes.
- The reboot will happen once the partition process gets started.
Resize Partition (Extend/Shrink)
The AOMEI Partition Assistant also lets its customers modify the partition size. One can extend the size of a particular partition by borrowing space from the unallocated location. The shrink partition will do the reverse, and it will lend more space to the unallocated location.
To extend the partition:
- Locate the disk that needs to be extended.
- Make sure that there is unallocated space next to it.
- If not, use the “Move Partition” function to move the desired disk towards unallocated space.
- Now right-click on the partition and go to the “Resize Partition” option.
- When the pop-up shows, select the drag pointer shown on the drive and drag it towards the right.
- Drag till the required file size is finally achieved, then click ok.
- Then click Apply from the toolbar and make the change.
To shrink the partition:
- Go to the disk and click on “Resize partition.”
- After the pop-up displays, drag the drag pointer towards the left direction to shrink the size.
- Drag till the drive is shrunk to the desired capacity.
- Click ok, then click on the apply option.
Delete Partition
Deleting the partition from AOMEI Partition Assistant will also delete the entire data present in that partition, so a backup is highly recommended. To permanently delete a partition, follow these guidelines:
- Go towards the desired partition.
- Right-click on it.
- Select the “Delete Partition” option.
- The quick deletion option will provide data recovery for the future.
- Delete partition and prevent data recovery option will permanently wipe all the data present inside.
- Click ok after choosing the option.
- Now click Apply.
- The partition will delete in a few minutes.
Format Partition
Formatting a partition refers to assigning a new file system to the partition. The AOMEI Partition Assistant lets one quickly format their drives into NTFS or FAT 32 file systems. The data inside gets wiped up too.
To format the partition:
- Select the disk that needs formatting.
- Right-click and choose “Format Partition.”
- Enter the required file system, partition label (optional), and cluster size.
- Click ok, and then click on Apply to start the formatting.
Recent Searches
- Is AOMEI Partition Assistant free?
Yes, the standard edition is free.
- Is AOMEI Partition Assistant safe?
Yes, it is safe and legitimate.
- Is AOMEI Partition Assistant available for Mac?
No, it is currently available on Windows Operating System.
Conclusion
Due to its user-friendly interface, the AOMEI Partition Assistant is easy to use. It’s also safe, secure, and quick.
You Might Also Like: AOMEI Backupper Review And Its Features