
The GoodNotes is one of the best iOS applications for reading and writing PDF files. They can literarily transform your iPhone, iPad, or Mac into a digital document management system. With this app, you can easily organize your documents due to its powerful and intuitive features.
Their main goal is to transform traditional paper documents into paperless technology. By going digital, you can easily move, resize the paper, or change the color of the pen you are using. Not only that, you do many things such as drawing a perfect shape, applying perfect straight lines, and many more.
With the rise of digital technology, many people have started to use this application on their computers. However, not all people are using iOS devices such as iPhones or Mac computers.
Therefore, they won’t be able to install the GoodNotes on PC directly. But this does not mean that there is no way to install it on a PC running a Windows OS.
Some people can still install it by running a macOS on their computer. And this is exactly what we are going to teach in this article.
If you are eager to find it out, proceed to the next topic to ensure that your computer is well prepared for the installation of the GoodNotes for PC.
Trending App: GotoMeeting Installation Guide For Windows & Mac
GoodNotes Windows PC Requirements
Since the only way to run the GoodNotes on PC is to run it from macOS, you have to emulate this Operating System inside the Windows.

Keep in mind that running a Virtual Machine on a Windows PC can slow down some old PC. So, make sure that you have at least the following requirements for virtualization:
- A Windows 11, 10, 8, or 7 Operating System that can support a 64bit API.
- You need the right amount of memory, which is more than 4 GB or more.
- A virtual machine relies heavily on a processor. So, it would be best if you had a fast dual-core or more processors to support it.
- It requires your hard drive to have at least 70 GB free or more.
- It needs you to enable Virtualization Technology (Intel-vt or AMD-v), which can be found on the BIOS. Allowing it can improve the performance of emulation.
Make sure that your computer exceeds or at least the above information. If your PC doesn’t have it, running the macOS on your Windows will only freeze your computer.
Install GoodNotes for Windows 11/10/8/7
To ensure that you will be able to download and install it on your computer, make sure that you read the guide thoroughly to install it successfully.
Get The macOS Big Sur
One of the best macOS that is compatible with GoodNotes is the Big Sur. You can also try the earlier version, but we recommend using this one. You have to find the “.vmdk” file of the macOS Big Sur somewhere else.
Download Goodnotes for Windows PC Using VirtualBox
VirtualBox is the virtualization software that you can get for free. Make sure that you download the latest version from their official website and then install it. This software can be installed easily by repeatedly tapping the “Next” button until you start it.
VirtualBox Setup
- Run the VirtualBox app and then click the “New” button.
- Name your virtual machine for anything you like, for example, “macOS Big Sur.”
- Choose the Mac OS X from the “Type,” and then the version should be 64-bit.
- Click the “Expert Mode” button and set up at least half of your real RAM. For example, if you have 8GB RAM; then, the Memory Size should be 4096 MB.
- On the Hard Disk option, select the “Create a virtual hard disk now” and then click the “Create” button.
- From the next window, adjust the hard drive space by entering at least a minimum of 70 GB. The hard disk type will also need to be the VMDK then click the “Create” button.
- Now, click the settings of your VM and then go to the Motherboard tab. Untick the “Floppy” disk and “Network.”
- Next is to adjust the core usage of the VM by clicking the “Processor” tab, then give it at least one or two cores. More cores mean faster.
- Go back to the left pane options and then select the “Display” and set the “Video Memory” to at least 128 MB and then click the “Ok” button.
- Now, it’s time to load the macOS Big Sur by clicking the “Add” icon and selecting the file that you downloaded earlier. Click the “Choose” button to proceed.
People Also Read: Download And Install Guide Of Workday App – Windows/Mac
VirtualBox Code Script For Command Prompt
After you finished the setup of the VirtualBox, the next thing that you need is to run a code to install the macOS Big Sur on a VirtualBox.
To proceed, open the command prompt as an administrator. Once the command prompt is running, enter the following codes one by one. Keep in mind that you have to replace the word “MacOS_VM_Name” with the name of your virtual machine. If you follow our example above, then the name of the VM will be “macOS Big Sur.”
Also, you have to close the VirtualBox application from your computer before you execute the code. If not, the virtual machine might fail to run it.
cd “C:\Program Files\Oracle\VirtualBox\”
VBoxManage.exe modifyvm “ MacOS_VM_Name ” –cpuidset 00000001 000106e5 00100800 0098e3fd bfebfbff
VBoxManage setextradata “ MacOS_VM_Name ” “VBoxInternal/Devices/efi/0/Config/DmiSystemProduct” “iMac19,1”
VBoxManage setextradata “ MacOS_VM_Name ” “VBoxInternal/Devices/efi/0/Config/DmiSystemVersion” “1.0”
VBoxManage setextradata “ MacOS_VM_Name ” “VBoxInternal/Devices/efi/0/Config/DmiBoardProduct” “Mac-AA95B1DDAB278B95”
VBoxManage setextradata “ MacOS_VM_Name ” “VBoxInternal/Devices/smc/0/Config/DeviceKey” “ourhardworkbythesewordsguardedpleasedontsteal(c)AppleComputerInc”
VBoxManage setextradata “ MacOS_VM_Name ” “VBoxInternal/Devices/smc/0/Config/GetKeyFromRealSMC” 1
Also, Check: How To Download Logic Pro X On Windows
Starting Up The Virtual Machine
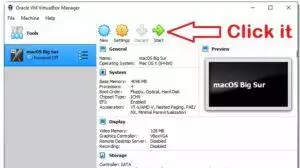
- Once you have completed the execution of codes, you can now start running the Virtual Machine if you cannot find the button.
- You will see a code, and then the Apple logo will start showing on the screen.
- After a while, the language option will show. Choose which one you are more comfortable with.
- Install the macOS and then agree to its terms and conditions. The installation takes a bit of time, so be patient while you wait for it.
- Once the macOS loads up, proceed to the App Store, and you can now start the search for the GoodNotes.
- Click the download button to install the GoodNotes on PC.
FAQs
I want to install the GoodNotes on my Windows computer without VirtualBox; how can I do that?
Unfortunately, there is no other way to run it on a Windows PC. The developers of GoodNotes make it exclusive only to the Apple devices. So, running a Mac inside a virtual machine is the only way to run it on Windows.
My computer is old, can I still run it?
You can try, but we cannot guarantee that it will work because virtualization requires significant processing power and memory to perform it successfully.
Will I get malware using it?
No, the VirtualBox is a legitimate program for virtualization. However, be careful when looking for the macOS file from different sources. Unfortunately, we cannot provide the details on how to get it.
Do I need to purchase the GoodNotes to get it?
Yes, this application is not for free. However, with its multi-features, it is a perfect app for PDF management.
Summary
In this guide, we have shown you how to run the macOS on the computer along with the installation of the GoodNotes on Windows. With the VirtualBox’s help, running an exclusive iOS app becomes possible to run on a Windows computer.
You Might Also Like: How To Download PixelLab On PC – Window 10/8/7/Mac
very good.. it works.
no se como poner los comandos donde dice por ejemplo, si dice “ MacOS_VM_Name ” que debo poner en su lugar “MacOS_VM_MacOS Big Sur”?
that the best taking note app in the world